【iPhone】GPUImageで複数のフィルターを同時に使用する方法
概要
GPUImageを使用して、複数のフィルターを同時に使用する方法。
今回は、Brightness、Saturation、Contrastフィルターを同時に使用する。
■GPUImage
https://github.com/BradLarson/GPUImage
方法
下記のように実装します。
UIImage *inputImage = [UIImage imageNamed:@"Lenna.bmp"]; //元画像
GPUImagePicture *imagePicture = [[GPUImagePicture alloc] initWithImage:inputImage];
// 明るさ
// Brightness ranges from -1.0 to 1.0, with 0.0 as the normal level
GPUImageBrightnessFilter *brightnessFilter = [[GPUImageBrightnessFilter alloc] init];
[brightnessFilter setBrightness:0.0];
[imagePicture addTarget:brightnessFilter];
// 彩度
// Saturation ranges from 0.0 (fully desaturated) to 2.0 (max saturation), with 1.0 as the normal level
GPUImageSaturationFilter *saturationFilter = [[GPUImageSaturationFilter alloc] init];
[saturationFilter setSaturation:1.9];
[brightnessFilter addTarget:saturationFilter];
// コントラスト
// Contrast ranges from 0.0 to 4.0 (max contrast), with 1.0 as the normal level
GPUImageContrastFilter *contrastFilter = [[GPUImageContrastFilter alloc] init];
[contrastFilter setContrast:0.8];
[saturationFilter addTarget:contrastFilter];

[imagePicture processImage];
UIImage *outputImage = [contrastFilter imageFromCurrentlyProcessedOutput];
実装方法としては、addTargetで順々につないでいき、
最後につないだフィルターでimageFromCurrentlyProcessedOutputを実行すると良いみたいです。
この方法以外に、グループを作ってフィルターをかけることも可能。
imagePicture - brightness
brightness - saturation
saturation - contrast
[imagePicture processImage];
[contrast imageFromCurrentlyProcessedOutput];
今回紹介したものをそのまま使用すれば、カメラアプリの色補正機能を実装することができます。
もちろん、その他のフィルターも使用可能なので試してみると良いかもしれません。
おすすめの書籍

- 作者: Matt Galloway,長尾高弘
- 出版社/メーカー: 翔泳社
- 発売日: 2013/11/02
- メディア: 大型本
- この商品を含むブログ (2件) を見る
クイズアプリ「QuizUp」の起動アニメーションがすごい!

アメリカのスタートアップ企業が開発したクイズアプリの起動アニメーションが素晴らしかったので紹介。
「QuizUp」
https://www.quizup.com/?source=plainvanilla
AppStore
https://itunes.apple.com/us/app/quizup-biggest-trivia-game/id718421443?mt=8
内容
グロースハックにおいて、初回利用ユーザの「感動値」を上げる演出が、
Activation, Retentionを最大化するために重要ですが、
QuizUpの起動アニメーションがその点でとても素晴らしかったので紹介します。
文章で表現すると下記のような感じです。
・起動と同時にアイコンと同じ色合いの背景画面を表示し、タッチからの流れに一体感を持たせる
・アプリロゴが組合わさっていくような動くアニメーションによりゲームアプリぽさを演出
上記のように文章で説明するのは難しいので、実際にアプリをDLして確認してみてください!
今回は起動アニメーションを紹介しましたが、
クイズからユーザ同士のコミュニケーションまで楽しめるアプリになっているので、
ぜひDLして試してみてください!
動画アプリ「メチカブーラ」のグロースハック事例

ショートムービーを撮影、編集、投稿できるアプリ「メチカブーラ」の導入演出がよく考えられていたので紹介したいと思います。
1.ユーザ登録は動画編集後に
メチカブーラはユーザ登録することで動画を保存できる仕組みになっており、
ユーザ登録処理を動画編集が完了した後に出している。
このように動画編集後に登録を促すことで「せっかく編集した動画だから保存したい」というユーザ心理をうまく利用できている。
2.デフォルトで有名人アカウントをフォロー
編集した動画を専用のタイムラインで共有できるのですが、
メチカブーラでは新規ユーザがデフォルトで有名芸能人のアカウントをフォローする仕組みになっている。
このようにすることで、新規ユーザでもタイムラインがコンテンツで埋まるようになっている。
また、TVとタイアップし芸能人を利用している点もコンテンツを拡散させることを意識した作りとなっている
Mechika Boola
【node.js】Sailsでtwitter bootstrapを使用する
概要
node.jsのMVCフレームワークのSailsでbootstrapを使用する方法。
■Sails
http://sailsjs.org/#!
■bootstrap
http://getbootstrap.com/
手順
プロジェクト作成
sails new testProject --linker
testProject/assets/linker/js 以下にbootstrap.min.jsファイルを設置
testProject/assets/linker/styles 以下にbootstrap.cssファイルを設置
views/layout.ejsとviews/home/index.ejsファイルを好きなように修正する。
初めてbootstrapをさわる場合は下記を試してみる。
http://getbootstrap.com/getting-started/
<!DOCTYPE html>
<html lang="en">
  <head>
    <meta charset="utf-8">
    <meta http-equiv="X-UA-Compatible" content="IE=edge">
    <meta name="viewport" content="width=device-width, initial-scale=1">
    <title>Bootstrap 101 Template</title>

    <!-- Bootstrap -->
    <link href="css/bootstrap.min.css" rel="stylesheet">

    <!-- HTML5 Shim and Respond.js IE8 support of HTML5 elements and media queries -->
    <!-- WARNING: Respond.js doesn't work if you view the page via file:// -->
    <!--[if lt IE 9]>
      <script src="https://oss.maxcdn.com/libs/html5shiv/3.7.0/html5shiv.js"></script>
      <script src="https://oss.maxcdn.com/libs/respond.js/1.4.2/respond.min.js"></script>
    <![endif]-->
  </head>
  <body>
    <h1>Hello, world!</h1>

    <!-- jQuery (necessary for Bootstrap's JavaScript plugins) -->
    <script src="https://code.jquery.com/jquery.js"></script>
    <!-- Include all compiled plugins (below), or include individual files as needed -->
    <script src="js/bootstrap.min.js"></script>
  </body>
</html>
【iPhone】GPUImageで「コントラスト、彩度、明るさ」を調整する方法
概要
GPUImageを使用して、画像の「コントラスト、彩度、明るさ」を調整する方法。
iPhoneで画像処理をする際の定番になりつつあるGPUImageです。
導入方法については他のブログを参照してください。
■GPUImage
https://github.com/BradLarson/GPUImage
方法
・コントラスト(Contrast)
setする値は、0.0~4.0。ノーマルは1.0
GPUImagePicture *imagePicture = [[GPUImagePicture alloc] initWithImage:inputImage];
GPUImageContrastFilter *contrastFilter = [[GPUImageContrastFilter alloc] init];
// Contrast ranges from 0.0 to 4.0 (max contrast), with 1.0 as the normal level
[contrastFilter setContrast:2.0];
[imagePicture addTarget:contrastFilter];
[imagePicture processImage];
UIImage *outputImage = [contrastFilter imageFromCurrentlyProcessedOutput];
・彩度(Saturation)
setする値は、0.0~2.0。ノーマルは1.0
GPUImagePicture *imagePicture = [[GPUImagePicture alloc] initWithImage:inputImage];
GPUImageSaturationFilter *saturationFilter = [[GPUImageSaturationFilter alloc] init];
// Saturation ranges from 0.0 (fully desaturated) to 2.0 (max saturation), with 1.0 as the normal level
[saturationFilter setSaturation:2.0];
[imagePicture addTarget:saturationFilter];
[imagePicture processImage];
UIImage *outputImage = [saturationFilter imageFromCurrentlyProcessedOutput];
・明るさ(Brightness)
setする値は、-1.0~1.0。ノーマルは0.0
GPUImagePicture *imagePicture = [[GPUImagePicture alloc] initWithImage:inputImage];
GPUImageBrightnessFilter *brightnessFilter = [[GPUImageBrightnessFilter alloc] init];
// Brightness ranges from -1.0 to 1.0, with 0.0 as the normal level
[brightnessFilter setBrightness:0.5];
[imagePicture addTarget:brightnessFilter];
[imagePicture processImage];
UIImage *outputImage = [brightnessFilter imageFromCurrentlyProcessedOutput];
おすすめの書籍

- 作者: Matt Galloway,長尾高弘
- 出版社/メーカー: 翔泳社
- 発売日: 2013/11/02
- メディア: 大型本
- この商品を含むブログ (1件) を見る
【iPhone】GPUImageで2枚の画像をBlendする方法
概要
GPUImageを使用して、2枚の画像をBlendする方法。
Blend方法は何種類かあり、PhotoShopにもある下記のようなBlendなどが可能。
GPUImageMultiplyBlendFilter: Applies a multiply blend of two images
GPUImageOverlayBlendFilter: Applies an overlay blend of two images
GPUImageColorBurnBlendFilter: Applies a color burn blend of two images
GPUImageScreenBlendFilter: Applies a screen blend of two images
GPUImageExclusionBlendFilter: Applies an exclusion blend of two images
GPUImageHardLightBlendFilter: Applies a hard light blend of two images
GPUImageSoftLightBlendFilter: Applies a soft light blend of two images
GPUImageAlphaBlendFilter: Blends the second image over the first, based on the second's
今回は上記のoverlayを試してみます。
■GPUImage
https://github.com/BradLarson/GPUImage
方法
下記のように実装します。
UIImage *originImage = [UIImage imageNamed:@"Lenna.bmp"]; //元画像
UIImage *layerImage = [UIImage imageNamed:@"blueImage.png"]; //合成する画像(今回は青い画像 )
GPUImagePicture* picture1 = [[GPUImagePicture alloc] initWithImage:originImage];
GPUImagePicture* picture2 = [[GPUImagePicture alloc] initWithImage:layerImage];

GPUImageOverlayBlendFilter* blendFilter = [[GPUImageOverlayBlendFilter alloc] init];

[picture1 addTarget:blendFilter];
[picture1 processImage];
[picture2 addTarget:blendFilter];
[picture2 processImage];

// 結果画像
UIImage* blendImage = [blendFilter imageFromCurrentlyProcessedOutputWithOrientation:originImage.imageOrientation];
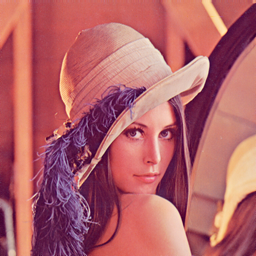
・元画像
・結果
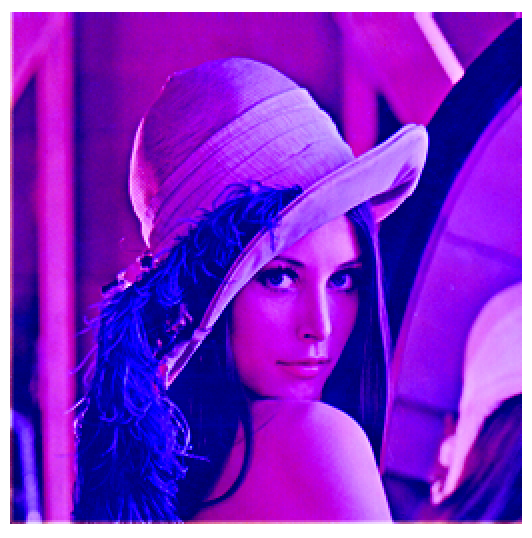
合成結果を出力する際に画像の向きを指定することで、結果画像が回転するのを防いでいます。
// 加工前の画像の向きを渡しているため回転しない
UIImage* blendImage = [blendFilter imageFromCurrentlyProcessedOutputWithOrientation:originImage.imageOrientation];
下記の方法だと端末を横にした状態で処理を実行すると画像が回転します。
// 端末を横にした状態で処理を実行すると画像が回転する
UIImage* blendImage = [blendFilter imageFromCurrentlyProcessedOutput];
今回はoverlayを試しましたが、その他のBlend方法も同じように実装すればできるはずです。
上記のBlendをうまく使えばオリジナルのフィルターを作成することが可能になります。
カメラアプリを開発する際はぜひ試してみてください!
おすすめの書籍

- 作者: Matt Galloway,長尾高弘
- 出版社/メーカー: 翔泳社
- 発売日: 2013/11/02
- メディア: 大型本
- この商品を含むブログ (1件) を見る
【iPhone】GPUImageで円ぼかしを実装する方法
概要
GPUImageを使用して、画像に指定したサイズの「円ぼかし」をかける方法。
iPhoneで画像処理をする際の定番になりつつあるGPUImageです。
導入方法については他のブログを参照してください。
■GPUImage
https://github.com/BradLarson/GPUImage
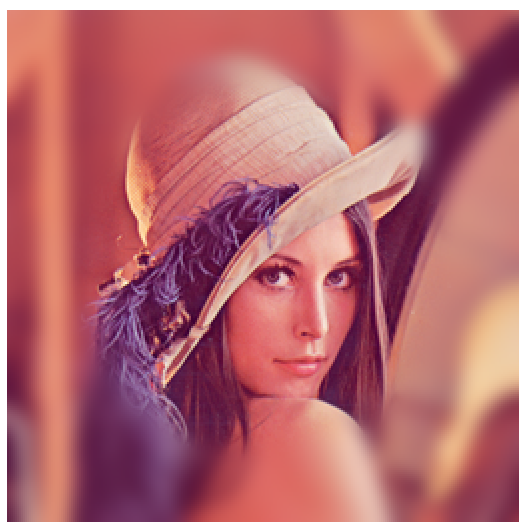
*実際にかかる円ぼかしは下記のようになります。境界線も自然に処理がかかっています。
方法
実装はとても簡単で、下記のように書くだけで実装できます。
UIImage *inputImage = [UIImage imageNamed:@"Lenna.bmp"];
GPUImagePicture *imagePicture = [[GPUImagePicture alloc] initWithImage:inputImage];
GPUImageGaussianSelectiveBlurFilter *blurFilter = [[GPUImageGaussianSelectiveBlurFilter alloc] init];
[(GPUImageGaussianSelectiveBlurFilter *)blurFilter setExcludeCircleRadius:0.4];
[(GPUImageGaussianSelectiveBlurFilter *)blurFilter setExcludeCirclePoint:CGPointMake(0.5, 0.5)];
[imagePicture addTarget:blurFilter];
[imagePicture processImage];
UIImage *outputImage = [blurFilter imageFromCurrentlyProcessedOutputWithOrientation:inputImage.imageOrientation];
UIImageView *imageView = [[UIImageView alloc] initWithImage:outputImage];
下記で円の半径、円の中心を指定していますが、
どちらも「0.0〜1.0」の間で記述します。
[(GPUImageGaussianSelectiveBlurFilter *)blurFilter setExcludeCircleRadius:0.4];
[(GPUImageGaussianSelectiveBlurFilter *)blurFilter setExcludeCirclePoint:CGPointMake(0.5, 0.5)];
その他のフィルターについて
GPUImageでは2種類の画像をBlendすることが可能で、まだ試しておりませんがPhotoShopにあるような、
オーバーレイ、ソフトライト、焼き込み、乗算なども可能なようです。
■Blending modes(一部)
GPUImageMultiplyBlendFilter: Applies a multiply blend of two images
GPUImageOverlayBlendFilter: Applies an overlay blend of two images
GPUImageColorBurnBlendFilter: Applies a color burn blend of two images
GPUImageScreenBlendFilter: Applies a screen blend of two images
GPUImageExclusionBlendFilter: Applies an exclusion blend of two images
GPUImageHardLightBlendFilter: Applies a hard light blend of two images
GPUImageSoftLightBlendFilter: Applies a soft light blend of two images
GPUImageAlphaBlendFilter: Blends the second image over the first, based on the second's alpha channel
mix: The degree with which the second image overrides the first (0.0 - 1.0, with 1.0 as the default)
GPUImageNormalBlendFilter: Applies a normal blend of two images
おすすめの書籍

- 作者: Matt Galloway,長尾高弘
- 出版社/メーカー: 翔泳社
- 発売日: 2013/11/02
- メディア: 大型本
- この商品を含むブログ (1件) を見る
